Monday, October 31, 2011

Marketing Tidbit: Make Packing/Shipping Easy

Today's Marketing Tidbit is a 2fer since I've been gone for so long.

First, some organization: I've tried going off memory to make sure that everything I want to go into packages actually gets in there.  I fail every time. - luckily, the item that usually gets left out is the invoice (annoying, but not critical).  I think it's because I don't ship a high volume of stuff, so I haven't developed habits from constant repetition.  I finally broke down and admitted I needed a system, so I made myself a checklist.
Click on the image to be taken to the Google Docs checklist.
Now you have a checklist too!

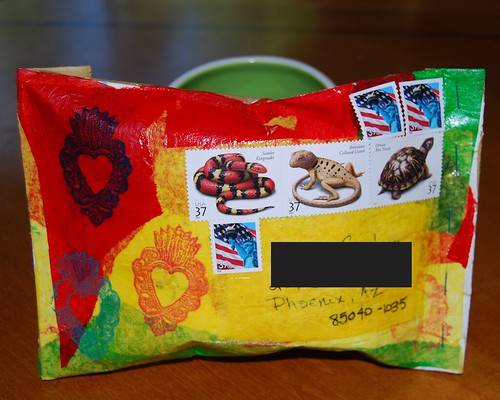
The "Linky Love" packet, for those of you who are wondering, is a little envelope of goodies and business cards from shops I buy from, work with and love.  Cross promotion between shops is a FABULOUS idea, but don't just throw your friends' cards in the package, tell your customer why you are sending them.  The wording on my note goes something like this:


There you go, two treats and no tricks!  Happy Halloween, everyone!


See all the Marketing Tidbits
Read more ...

Friday, October 28, 2011

Sugar Skull Mask Tutorial!! Woo Hoo!

A little over a week ago, I was lamenting the loss of my muse on Facebook and Google+ in the hopes that someone would say something to spark my imagination. Most of my artist friends were also dealing with creative blocks, so we figured that our muses all took off with the 'blue flu' (or whatever prompts inspirational goddesses to go AWOL for a day).

Luckily for me, my friend Betty called me with a request and challenge.  Could I make her five Día de los Muertos style sugar skull masks.  *LIGHT BULB!* I sure could!


My friend and hairdresser, Betty, and I talk about Mexican folk art and culture constantly.  Her heritage is Mexican, while I first became enamored with all things Mexico when I lived in San Francisco's Mission District, a vibrant neighborhood with a large Latino population. I really love Day of the Dead, which mixes both Aztec and Spanish beliefs and cultures into something new and wonderful. This holiday particularly appealed to me as it focuses on death as a part of life and not as something to be feared.  Well this year, Betty is teaching a series of classes (she teaches for Paul Mitchell) with a hair/fashion show.  In Mexico City. On Dia de los Muertos, and she asked me to make some sugar skull masks for the models!  Woo hoo! Here's how YOU can make them too:

You will need:
  • Mask - plastic, Papier-mâché, or even ceramic if you are creating a wall decoration
  • Rubbing alcohol
  • Glue - choose one that is appropriate to the substrate of your mask
  • GLITTER! - lots of it in lots of colors!   You can use just about any type of glitter (loose or glitter-glue).  DO NOT USE antique German glass glitter or any glitter made of glass.  It will be near your face (and eyes), so let's not go blind, m'kay?
  • Paintbrushes for glue, watertoothpickspaper towelsfluffy paintbrush for brushing away loose glitter
Optional supplies:
  • Plastic primer
  • Clear/white glitter spray (I didn't use this, but will point out where you could)
  • Glitter tray or folded paper to return loose glitter to jars
  • Dryer sheets <--- secret weapon when using glitter!
Betty chose some 1/2 face 'Phantom of the Opera' style masks, but you could use eye masks or full face masks if you prefer.  You could use plastic, papier mache, fabric masks or even ceramic ones for a cool wall hanging.

primer
unprimed mask (left) and mask with adhesion
promoter and matte white primer (right)
1.  Remove the elastics and set them aside, then clean the masks with some rubbing alcohol to remove any residue or fingerprints.

1a.  OPTIONAL STEP - skip if you just need the mask for one night.  Since these masks will be packed and taken with Betty to Mexico, I chose to prep my masks to ensure the best contact between the products and the mask.  I started with an adhesion promoter for plastics (from the auto section of my local hardware store) and then added a layer of matte white primer for plastics (don't use gloss or you'll be back where you started).

blackbase1b. OPTIONAL STEP: You could spray your entire mask with clear glitter spray at this point to give the entire face a "sugary" look!

2.  Paint or sketch an outline of the shapes you want to create.  Painting your shapes first helps to make sure the glue goes where you want (working with white glue on a white mask is a bit confusing).  Also, pre-painting helps to prevent the white from peeking through the spaces in the glitter, I painted the nose and around the eyes with black paint (I tried at first with sharpies, but they were a bit trickier on the "topography" of the mask - a brush is more forgiving).

IMPORTANT TIPS! 
  • If using loose glitter and glitter glue, START WITH LOOSE GLITTER first
  • WORK FROM DARK TO LIGHT COLORS!  It's much easier to get a grain or two of yellow out of your black sections than to get black out of your yellow, etc.  Trust me on this one.

glue3.  Brush your glue over the DRY painted area (a brush gives you more control and precision than squeezing from the bottle).  I chose a flexible fabric glue for gems and beads, because I expect the masks to flex a bit during travel.  Most people would get great results just using a good quality white craft glue.

IMPORTANT TIP!  WORK WITH ONE COLOR OF LOOSE GLITTER AT A TIME.  Don't paint glue on for more than one color of glitter.


4.  Pour that glitter on!

Crafty Chica Be-Bob Black glitter
by Duncan Crafts
Tips - using a glitter funnel/tray is very helpful (mine is a Tidy Tray which I scored for a few bucks at a craft show), but if you don't have one, you can use a piece of paper, folded in the center to return unused glitter to the bottle.  Want another tip?  Rub a dryer sheet over the surface of your funnel tray or paper before sprinkling glitter - it will keep the glitter from sticking and return more to the bottle for you to use later!

5.  Repeat for each color of loose glitter.
pattern traced with a silver Sharpie
Glue painted over spiderweb pattern
Pour that glitter!
This is Tulip (by Duncan) superfine holographic silver washable glitter.
I could NOT live without this product.


6.  Did you miss a spot?  No worries!  Just pick up some glue on a toothpick or bamboo skewer and fill in the blank spots, then add more glitter.
I love bamboo skewers and keep them in my craft drawer at all times.
This glitter is Crafty Chica's Pop Star Purple by Duncan
Let the loose glitter set/dry between layers OR if using glitter glue next, you can move on immediately.

8.  When you re finished with your loose glitter application for the day, you can start applying glitter glues.
I love glitter glues and swear by Ranger's "Stickles" glitters;
while the bottles are small, they last a long time and are very fine
 and acid-free.  You can find them at most crafting or scrapbooking shops.
Sometimes I like to blend colors together, like the yellow, orange and red in the flames.
Once again, toothpicks and bamboo skewers are VERY helpful!  Just run them back and forth in the glitter and you end up with an artsy fartsy look.

9.  After everything dries (I let it dry overnight), brush off the loose glitter with a fluffy paintbrush.

10.  If you like, you can add some silk or crepe paper flowers.  I attached these with a little hot glue and some E6000 (because they were traveling to Mexico - yours will be fine if you use hot glue).
A few flowers from the Dollar Store and a plastic skull from the Halloween section at my local craft shop!
Leaves and flowers from the Dollar Store, and a plastic skull bead glued to a butterfly from my local craft store.


THAT'S IT!  Now you can just reattach your elastics and rock the party!

Let me know if you have any questions - I'm happy to answer them here.

Read more ...

Thursday, October 27, 2011

Excuses, Tutorials and A BIG-ASS GROUP SALE!

Have you been wondering where I was?  Yeah.  Me too.  First, I survived "The Plague" (OK, it was really just strep & sinusitis) which seems to be going around with a vengeance this Autumn.

Second, I've been blogging every week over at Modern Rosies (and I have another really REALLY awesome Ask Krissi's Art Studio tutorial publishing tomorrow!).

Third, and this is the biggie, the GB Handmade team of creative types has been busy behind the scenes cooking up a GREAT pre-holiday sale for all of you!  We're calling this our Skull Appreciation Sale 'cause it's that skully time of year and, let's face it, you'd look funny without your skull (not to mention several other non-cosmetic issues you'd have).

clicky-click for larger version
Here's what will be on sale starting Monday (Halloween!) and going through Wednesday (Día de los Muertos):
Wow.  That's a LOT of stuff to remember!  Well, to make your shopping experience super easy, we will have our sale information in our shop announcements AND you can click this handy little widget, which you'll find in the right side bar of each of our ArtFire shops, which will take you directly to all of our sale items (ArtFire shops only).
October 31st through November 2nd
FIRST GBH SKULL APPRECIATION SALE!

Click skully for sale items from GB Handmade Members & Affiliates
when you use coupon code BRAINCASE.
Need more info? Visit GB Handmade on Blogger!

We hope to see you on Monday (but you can click on the skully for a sneak peek at some of the sale items now).
Read more ...

Thursday, October 13, 2011

Handmade For The Holidays

Folks, here's a little one-hand-washes-the-other action for you and me. Listen up.

ArtFire.com and Amazon.com have revamped their wish list integration.  What that means:
  • you can add ANY ArtFire item to your Amazon wishlist with the click of a link (conveniently located right under the "Add To Cart" button, and
  • when you add an ArtFire item to you Amazon.com wish list, that item and the artisan's shop (let's say, oh, Krissi's Art Studio, home of Skelekitty & Friends) will get more hits! 

How great is that for promoting handmade for the holidays?  Pretty great, I think.  I've already added all kinds to handmade goodies to my public wishlist!

What's in it for you?  That's a fair question.  I mean, I did promise some reciprocity.  ;)

Well, starting this week and for the next 10 weeks, Amazon is giving away $2,500 Amazon.com Gift Cards to a lucky winner who has added goodies from another website to their Amazon wish list. You want $2,500 of free shopping money, doncha? Well then add at least one item to your wish-list every week!  Week 1's contest ends on the 16th, so you still have time to get in there.  (If you don't have an Amazon.com account yet, they're really no hassle to sign up for.) http://www.amazon.com/gp/registry/wishlist
official rules here

Read more ...

Friday, October 7, 2011

Looking For A Few Good Bloggers

I know, it's sort of cruel to get you hooked on a tutorial that's spread across six entries and then leave you hanging with nothing on a Friday.

Except I didn't.

where empowered people get inspired
Every Friday, I publish an Ask Krissi's Art Studio column on Modern Rosies, a blog on September 1st, 2011 by bag designer Brooke Van Gory.  Brooke wanted to bring all of her creative friends together in a single place where they could share DIY, art and handmade tips, tutorials, indie business information, product picks, recipes and more. And boy, oh boy, our first month has been great!  So far our "Union Riveters" (the main behind-the-scenes collaborators) have published a recipe for "Chocolate Frogs," sewing tips & tutorials, a how-to on painting and modifying toys, an eye-opening article on animal products in cosmetics, some serious money-saving tips and plenty more awesome information.

We are also looking for articles from other members of the DIY community (that's where you come in).  So ask yourself, what do you know how to do that would interest the majority of people who either make/buy handmade or are handy fix-it types?  If it's:
  • Focused on the DIY/handmade movement
  • Instructive (tutorial/how-to, tips, techniques or product reviews) 
  • Related to house & home, automotive, craft, art, indie business issues or computers
Write it up and send it (with photos attached) to us at modernrosies@gmail.com.

Well?

What are you waiting for??

Oh yeah, and go read today's tutorial from your's truly.  It's how to upcycle a padded mailer with leftover scraps of paper.

Read more ...

Thursday, October 6, 2011

The How-To on How-To's Part II (Writing Style)

Here we are at part 2 of my how-to on how-tos.  By breaking this tutorial-writing tutorial up into sections, you have a little more time to focus on each aspect of writing a good tutorial before I throw the next bunch of information at you.


Last time I covered the importance of using photos in your posts (feel free to review that before we go on, I'll wait), so that brings us to:
PART II: WRITE CLEAR, SIMPLE INSTRUCTIONS
Intro: The purpose of publishing tutorials is, in short, to help people.  Admittedly, tutorials are also a great marketing tool with which to showcase your knowledge, writing style and/or craft, but if it doesn't teach people how to do something, then it has failed at being a tutorial.  If you're writing for yourself, or if your audience is unable to understand you easily, your time would probably be better spent elsewhere.  Harsh.  I know, but there you have it.

Use a structured format. I dig literature. I have a love for Joyce's stream of consciousness literary style and the long, meandering story-telling of American writers from the Deep South.  However, rambling in a tutorial makes me click away quicker than green grass through a goose. True story.  Have you ever wondered why I use bullet points so often? Outline formatting is a habit I picked up from my years of writing licensing contracts and doing regulatory analysis. It works so well for instructional writing that I use it often in my posts.

An outline format:
  • is easy to read
  • stands out on the page - it says "here are the instructions!" and 
  • makes referring back easy; your reader won't have to scan through long paragraphs to find information
  • serves as a checklist when printed out
Write simply.  Don't plan on getting mileage out of your fancy vocabulary in a tutorial. Instructions are difficult enough to follow without making readers stop to look up words like "contiguous" (just say "next to each other").  If you choose the simplest, most concise words to describe what you're doing, your tutorials will reach a wider audience base.  People will also make fewer mistakes (read that as "get less frustrated") which means your popularity as a tutorial writer will grow.

Be conversational.  You aren't writing a scientific research paper for publication in the Journal of the American Medical Association, so you should feel free to engage your readers in conversation.  Heck, use  colloquialisms (well-known expressions or slang) or crack a joke every now and then; nobody is going to rap you on the knuckles with a ruler for goofing off in class.

Here is a trick I used in college when I was a writing tutor: try reading your instructions aloud.  Do they make sense?  If you find yourself tripping over sentences or words, revise those parts. Whenever I read my tutorials to my husband, I edit as I go.

Use proper grammar and punctuation.  I cannot stress this enough.
Not sure about proper punctuation?
Periods and commas are
nothing to be ashamed of.
  1. Colloquialisms and jokes are great, but never use LOLspeak, SMS or texting abbreviations, leetspeak or any other form of un-grammar in a tutorial (exception: if you are writing a tutorial on technology-based "grammar").  If you use any "txtese" in your tutorial, 
    • Best case scenario: you exclude anyone who doesn't understand what you are saying.  Why bother writing a tutorial if most people can't or won't read it?
    • Worst case: you come across as irritating, uneducated and/or too lazy to write a sentence.  Yipes.
    • All the squiggly red lines under your abbreviations are going to distract you from the other spelling errors.
  2. Spelling is pretty easy to check with a spell-checker, assuming you haven't used the wrong version of a word like "then" instead of "than."  Common grammatical errors, I'm sorry to say, will also turn off many readers.  If you are unsure about when to use "its" and "it's" (that's a confusing one, too), just do a quick search on Google.
  3. My current pet peeve is misuse of the ellipsis (aka "dot dot dot").  These should be used only when something is left out of a quotation or is intentionally left unsaid.  If you want to pause, try our old friend the comma or live wildly and start a new sentence.
    Ellipsis have three (3) periods "..." (a fourth is optional, but only at the end of a sentence).  Adding an extra 12 in a Facebook post might be cute, but in a tutorial, not so much.
  4. Use a reference book.  OK, this is for the hard-core of us out there, but it is an option. Most people have thrown Strunk & White to the wind in preference of On Writing Well, but my favorite is The Deluxe Transitive Vampire.  It's funny, helpful and it makes a great conversation piece when people see it on your bookshelf.  People ask me about that book more than they ask about my gigantic O.E.D. (acquired in ye olde pre-internet days).
  5. And the simplest tip: have someone read your work or proof it the next day with fresh eyes.
Sure, you could go with Elements of Style, but
why would you want to? This is so much cooler!
I know, you're probably shouting, "Krissi! This post is chock full of rules to remember!"  Well, don't get too panicky about them. Just work on communicating what you want to say in the simplest manner possible.  Pretend you're having a conversation with someone and avoid the temptation to fancy up your language to "sound like writing" or to use punctuation you aren't sure about.  After that, just proof it with fresh eyes (yours or someone else's) and go for it.

Next time:  Links!
Read more ...

Wednesday, October 5, 2011

The How-To on How-To's Part I (Photos)

I was recently named "best tutorialer on the web" by my friend Rachelle Rose.  OK, so it's not a REAL award, but dang it, I think I do write tutorials pretty well.  Once I finished patting myself on the back for that major award, I realized something.  If I am so great at writing tutorials, I should probably write one on how to write tutorials.  And so, here we are.

I've decided to turn this into a series, rather than throwing it all at you at once.  This way, I can spend a little more time going through and fleshing out or editing the sections for you, and you get a little more time to focus on each aspect of this how-to how-to.  Here's what you can expect me to cover (I may throw in other stuff as we go):


PART I.  USE PLENTY OF PHOTOS

It doesn't matter whether you're writing about crafts or Photoshop basics, people need to actually see what you are doing.  The trouble with blogs is that the written word often causes misunderstandings - the great thing about blogs is that you can embed pictures!
Tape Transfer tutorial
BONUS: I've had HUNDREDS of hits on my image transfer
tutorial as this photo keeps being "pinned"and "repinned!"
Document your process.  Take photos (or screen shots) of each step, technique and process. If you have trouble identifying at which stage to take each photo, volunteer a friend and teach them how to use/make your product/project and every time you say "and now you..." have them take a photo.   I also like to include a shot of supplies or the setup and a shot of the final piece.

"Tijuana Makeover" from woodburned outline
to finished mixed-media painting
Give a visual timeline.  Consider editing your photos together into a collage to show your process.  I've had great success with Mosaic Maker by BigHugeLabs using the photos I uploaded to my Flickr account, and I've also created my own using photo editing software.  It's pretty easy and it REALLY helps people to see everything at once.

Point out the little things.  Let your inner "John Madden" out - use your editing software to label details.
You may be able to pick out the details clearly, but
someone new to your process may not - help them out
Make use of the photo captions.  Even if you're explaining everything in the text, pop a little something into the caption that will lead them back into the tutorial.

Now that you know how to use the photos in your post, here are a few tips to keep in mind when you are taking your photos:
  • make sure your lighting picks up the details you want to show (avoid the temptation to "white out" your photos with overexposure)
  • the area being photographed should be uncluttered (and free of pet hair, etc.)
  • use a solid color background to avoid distractions (and please, don't use your bedspread)
  • leave the artsy-fartsy stuff-on-books pictures for your Etsy listings; they have no place in a tutorial
  • crop your photos and adjust the brightness and contrast, if necessary, but don't give your photos an over-processed look or mess with the depth of field (see above)
  • take more pictures than you think you'll ever need, then take a few more

I hope this series becomes a helpful resource for you all.  

If you have a question about writing tutorials, please post a comment here or in any future installments of this series.

Next time: writing style


Read more ...

Tuesday, October 4, 2011

We Apologize For This Brief Interruption In Service.... *beeeeeeeeeeeeeep*

Hi everyone!  *cough*  I still have plenty of marketing tidbits for all of... of... *AhhhCHOO!* ...you coming up in the very near future. *sniffle* I promise.

I hope to be back in the full swing of things by the end of this week or early next if the stuff the doctor gave me works on this nasty head-cold-turned-strep-throat thing I've got going. *cough*

Oh, and just ignore Brooke Van Gory if she tells you I have The Plague; I'm fairly certain that I don't.  LOL.

My writing skills may have suffered, but at least I can still paint in between sneezing, coughing, washing my hands and complaining to my husband about how I'm sick.
8x10" owlets in progress
(yeah, they already have a home)

Read more ...